Saturday 5 November 2011

Working with a Codespaces.com Git repository on Windows–Pulling your code

This post is third part of a mini series which I have written to aid in setting up and using your Codespaces.com Git repository remotely on Windows. Links to the previous posts in the series can be found below.

  1. Getting started; setting up your SSH Public Key
  2. Pushing your code into the hosted repository
  3. Pulling your code from the hosted repository (this article)

Compared to the previous steps in this series this is relatively straight forward however was the more complicated to work out.

Pulling from your remote repository

First off create the new folder where the local repository is going to be located. Once the new folder has been created right click on the folder and select “Git GUI here”.

In the resulting dialog select the “Create New Repository” option as seen below.

image

When prompted select the new folder which you’ve just created as to where the new repository is going to be created. I found the selection process would automatically select the folder you had right clicked on when selecting the browse option but check. Once successful this will fire up the Git GUI which we were using in the previous post.

At this point we need to drop to the Git bash command line. It has something to do with wanting to make sure people are using Pull correctly and so is not possible through the GUI as far as I could find.

Fire up a Git Bash shell instance. You can either do this by clicking on the shortcut, finding the program in the Start menu or right clicking on a folder and selecting “Git bash here”.

Once this is started make sure you at the correct location. If you are not in the required folder it can be easily remedied by using the command “cd” followed by the location of the folder you have just created. As this is a linux/unix type shell running in windows it doesn’t understand “c:\” so to change the path to “c:\src\folder\trunk” you will need to type:

cd /c/src/folder/trunk

Once you have navigated to desired folder location then you need to type the following command:

git pull git@codespaces.com:username/gitrepository HEAD

Replacing the username with your own username and gitrepository with the desired git repository name.

On executing the command it will prompt you for your passphrase. Don’t be alarmed if nothing gets displayed on the screen this is just how this shell works for security. If you type it incorrectly it will ask you again. If at any point you want to stop the command start again you can press “ctrl+c” and it will cancel.

image

Once you have entered your passphrase correctly it will contact the remote repository. The bash shell will then display something similar to the above logging the actions of which it is performing.

Once it has finished performing this action you can browse to your new folder you have created and will have the code in place ready to edit again.

Conclusion

In this post we have setup a new local repository to mimic computer move or hard drive failure and pulled the latest code from the master branch of our Codespaces.com remote git  repository into our newly created local repository.

Working with a Codespaces.com Git repository on Windows–Pushing your code remotely

This post is the second part of a mini series which I have written to aid in setting up and using your Codespaces.com Git repository remotely on Windows.

  1. Getting started; setting up your SSH Public Key
  2. Pushing your code into the hosted repository (this article)
  3. Pulling your code from the hosted repository

Pushing to your remote repository

The first step to pushing your code into a remote repository is to create one in your Codespaces.com Admin section. You will find a settings area where you administer your users, projects, repositories and backups.

Once here click on the ribbon button to create a new Git repository.

image

A dialog will appear asking for information about the new Git repository. Fill in all the details which the required taking note of the name of the repository as this will be required later.

image

I’m using a code project which was originally posted on Github for some example code to post.

Once the information has been filled in click “Save” and your new repository should appear in the list on the right hand side. If this doesn’t automatically appear then select the “Git Repositories” option from the “Settings” tree view on the left and it will refresh the list and should now appear.

image

If there is a notification of failure or you are unable to see the repository in the list then try again. If this continues to be unsuccessful then contact Codespaces.com support.

If you now navigate to the “Source Code” tab and select the newly created repository from the dropdown you will see that it has been created but there are no folders in it yet. It will display a folder called “Empty Repository” however this is not a real folder and will disappear once you have submitted some code to it.

The repository has been created and you will be given a url on which you can access it by. It will be in the format of:

git@codespaces.com:username/repositoryname

Please replace username and repositoryname as required with your specified credentials. These can be found next to the branches dropdown list on the “Source Code” tab.

Getting Git Working

The next step is to get Git, which has been installed on your computer, talking to the remote repository we’ve just created and to push the code into it.

Find the folder where your code is. This will be where you already have an established local repository where you have been committing changes to for a while. Right click on this folder and click “Git GUI here”. This will fire up the Git GUI at this location.

At this point Git locally doesn’t know about the remote location so we need to add the information into the system. Click the “remote” option in the tool bar and “Add …”.

image

Fill in the required fields making use of the url which was created earlier when initialising the repository. Select the “Do Nothing Else Now” option as we will perform the Push in a minute.

Once you are happy with the information click “Add”. Now go back to the Git GUI and re-select the “remote” option in the tool bar. You will be presented with more options now a remote connection has been setup.

image

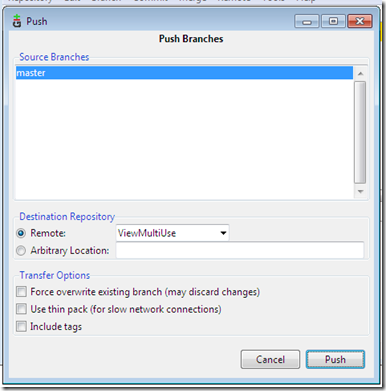
In the main window click “Push” from the list of action buttons which appear towards the bottom of the screen. In the dialog which appears select the correct remote destination repository. This dropdown will only have the remote location you just entered unless an additional location had already been setup.

image

There are a number of options here which you can select. You may need to Force the overwrite of the existing branch if you are working with an old branch you want to re-use or if something has gone wrong earlier. Finally click “Push”.

A new dialog will appear and it will inform you that it is pushing the code to the repository and sit there for a few seconds.

image

At this point it another window will prompt you for your passphrase you created in the first part of the series and click ok.

If everything went well you will get a big green success bar displayed.

image

Now to check that it worked we want to check the remote repository. Navigate back to the “Source Code” tab in your Codespaces.com dashboard and refresh your repository listing.

image

You will find that the “Empty Repository” folder which was there earlier has now disappeared and been replaced with your committed code. You can now browse the code online through this web application view.

Conclusion

In this post we have created our remote Git repository in our Codespaces.com account and pushed up the content of our local Git repository using the Git GUI.

Next time we’ll be pulling the remote repository code down onto our development system in a brand new local repository to replicate hard drive failure or a multi development machine environment.

Working with a Codespaces.com Git repository on Windows–SSH Key setup

This post is the first part of a mini series which I have written to aid in setting up and using your Codespaces.com Git repository remotely on Windows.

  1. Getting started; setting up your SSH Public Key (this article)
  2. Pushing your code into the hosted repository
  3. Pulling your code from the hosted repository

Getting started

To start off you need to download and install msysgit which will give you the basics; make sure you include the “Git bash” and “Git Gui” options during the installation.

SSH key creation

First step to working with Codespaces repositories, or any remote git repositories, is to create a ssh key. This is done by using the git bash shell. The shortcut looks like this:

image

Once the bash shell has loaded you will be presented with a command line interface similar to a linux/unix command line.

image

Type ‘ssh-keygen’ and something similar to the following will appear. Leave it with the default locations as this will aid in locating the files later.

image

The process will ask you for your passphrase. Remember this as you will be prompted for it every time you want to perform actions on the remote repository.

Once the file is created you will be returned to the command prompt. At this point locate the file in the location where it was originally specified - in my case c:\users\west\.ssh - and you will find two files; “id_rsa” and “id_rsa.pub”.

Open the id_rsa.pub file in notepad (other plain text editors are available) and minimise as you will need this in a few minutes.

Log into your Codespaces.com dashboard and navigate to “My Profile” and then “SSH Keys”.

image

This is where you will need the notepad instance you minimised earlier. Copy the contents of the file and paste into the “Key Value” text box. Set the value of the “Key Name” to something appropriate; for this example I have called it “Public”.

image

One thing to note, make sure you remove any additional carriage returns from the end of the key value entered value. Once you are happy with this click “Add Key”. If this has been saved successfully you will be notified and the key will be listed on the right hand side.

This action will have performed what you need for encryption keys to allow access between your computer and remote Codespace repository. Please keep the keys safe and secure as you don’t want any unauthorised people getting access.

Conclusion

In this post we have created our ssh keys and added them to our Codespaces.com account information to allow for remote access.

Next time we’ll be pushing our local repository code into the remote repository.

Working with a Codespaces.com Git repository on Windows–Mini series

I have been working on my personal development projects in local git repositories for a while now and wanted to get them into my Codespaces.com remote git repositories for backup. Its fine having source control locally but no help if the hard drive ever failed.

On doing some research on the internet I found there was almost nothing on getting setup with Windows and Git on Codespaces.com so I have put together this mini series of posts to aid others in doing so. The information in these posts are the processes I went through with getting setup so I hope they will help others.

In this series I’ve broken it down into three main aspects which you need to do when using Git and Codespaces.com.

  1. Getting started; setting up your SSH Public Key
  2. Pushing your code into the hosted repository
  3. Pulling your code from the hosted repository

This series is not a how to for Git usage as there are many of those out there and I have found the following links below helpful.

http://www-cs-students.stanford.edu/~blynn/gitmagic/ch03.html

http://nathanj.github.com/gitguide/tour.html